How to upcycle like a stylist

Published November 2022
Whether you’re new to upcycling, or you’d just like a little inspiration, these ideas from interiors pro Ellie Tennant are perfect for mini makeovers.
Upcycling is a simple way of putting your own stamp on pieces without blowing your budget. Forget about fiddly craft projects that require lots of time, money, tools and skill – the best upcycling ideas are simple, inexpensive and quick, with impressive results.
Make a chalkboard feature
Update an old piece of furniture and turn it into a designer-style item.
You will need: An old wooden piece of furniture (cupboard, chest of drawers, table or chair), a pot of chalkboard paint (try homebase.co.uk  ), a brush, gloves, sandpaper, cloth and white chalk.
Method: In a well-ventilated space, gently sand your wooden item to ‘key’ the surface and remove any varnish or paint finish. Remove all dust with a damp cloth and leave to dry. Place the item on newspaper and use a brush to apply chalkboard paint. You might need to do several coats. Leave to dry, then decorate every day with chalked messages or doodles.
Top tip: Use liquid chalk marker pens instead of real chalk sticks to avoid messy white dust in your home.
Create crate cubby holes
Use vintage wooden crates to create bespoke wall storage solutions.
You will need: A wooden ‘bushel box’, (www.usedhorticulturalmachinery.co.uk  ), screws, drill, screwdriver, rawlplugs, pencil and spirit level.
Method: Decide where you want your crate to go and ensure the wall is free of water pipes and electrical wires using a detector (around £40 at screwfix.com  ). Turn the crate on the side, so it looks like a cubby hole, and hold it up against the wall. Use a spirit level to get the crate straight, then draw a light pencil line along the top of it as a guide. Put the crate upside down on the floor and use your drill to make two holes in the top right and left corners of your crate.
Next, hold the crate up against the pencil line and make dot marks through the two holes. Use your drill to make holes in the wall, then fit rawlplugs. Hold the crate in position and use a screwdriver to fix it in place with two screws. Repeat the process as many times as required.
Top tip: for no-drill, temporary storage, simply stack a few crates together to make low, free-standing shelving units.
Dip-dye a basket
Two-tone wicker is all the rage, so why not try your hand at turning a boring basket into stylish storage.
You will need: An old basket, some leftover paint, a plastic storage box and plenty of newspaper.
Method: Pour the paint into your plastic crate, then slowly dip the bottom section of your basket into it. When you have achieved the desired result, lift up the basket then suspend it to dry above sheets of newspaper to catch any drips.
Top tip: White paint looks ultra-chic, or try bright, fluorescent colours for an eye-catching result.
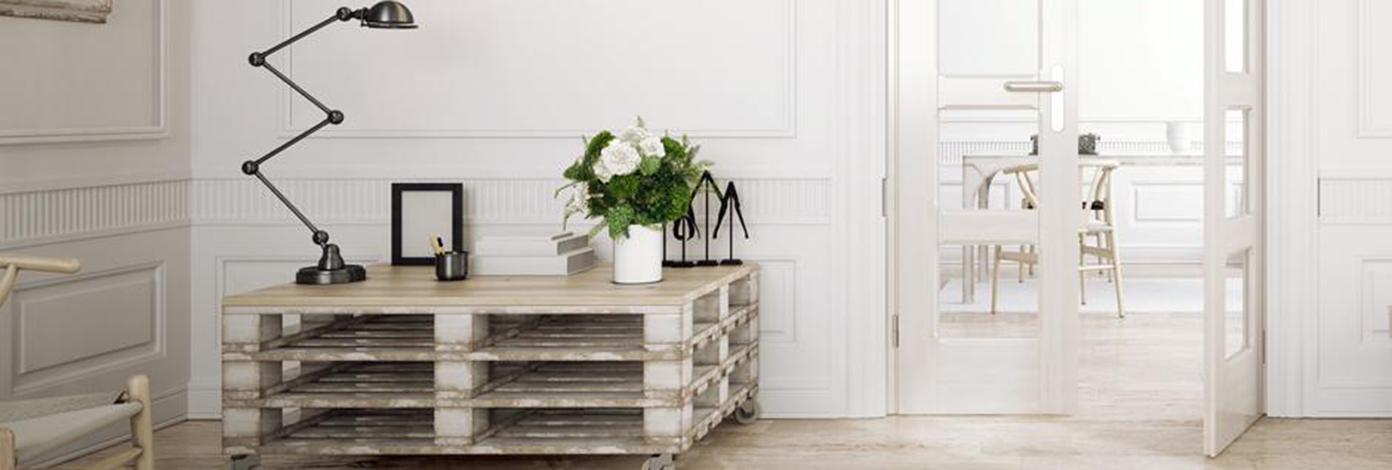
Make a pallet coffee table
Tap into the industrial trend and make a rough-luxe piece that can easily be moved around the living room.
You will need: A solid wooden pallet, (ask at your local shop or builders’ yard – they are often available for free), sandpaper, gloves, four heavy duty swivel castors (from screwfix.com), screwdriver and screws.
Method: Outside, sand down any splinters or rough areas on the pallet until they are smooth and safe to touch. Then screw the castors into the corners of the underside of the pallet.
Top tip: Make sure your pallet is in good condition and super strong.
Revive a lovely lamp
Update a tired-looking old lamp with fresh colours and a new homemade shade to turn it into a focal point.
You will need: An old floor or table lamp (with a shade), newspaper, gloves, spray paint (try plasti-kote.co.uk  ), a lampshade kit (try dannells.com
  ) and leftover fabric or wallpaper remnant.
Method: Remove and discard the old shade, then place the base on newspaper in a well-ventilated area or outside. Make sure you cover the electrical cord with newspaper, too. Spray-paint the lamp base in a colour of your choice, ensuring you build up the colour gradually in thin layers to avoid drips. Leave it to dry and remove your gloves. Follow the kit instructions to make your lampshade, using either fabric or wallpaper – or try using something a bit quirky, such as sheet music or pages from secondhand books.
Top tip: Before spray-painting, place your item on a flat, black bin bag on top of newspaper so that when it dries, it won’t stick to the paper.
Ellie Tennant specialises in vintage and lifestyle areas. Find more of her ideas at ellietennant.com  or follow her on twitter @ellie_tennant
  .
.
This Money Talk post aims to be informative and engaging. Though it may include tips and information, it does not constitute advice and should not be used as a basis for any financial decisions. Sainsbury's Bank accepts no responsibility for the opinions and views of external contributors and the content of external websites included within this post. Some links may take you to another Sainsbury's Bank page. All information in this post was correct at date of publication.
